FPGA tooling: disk upgrade
2 weeks ago fpga logipi linux virtualbox disks nablopomo
I've been working on resurrecting the Logi-Pi FPGA board for the Raspberry Pi. I managed to update the tools for it, so that I could load a precompiled bitstream to it from a Raspberry Pi 5 (which wasn't even out when the Logi-Pi first came out) - and the next step is to install the FPGA toolchain, so that I can write my own code for it.
First problem with that: the FPGA toolchain is big, as in lots of gigabytes, and alas the disk of the VM I'm working doesn't have enough space... and the host disk doesn't have enough free space to extend it. Sad times.
Time to purchase a new, bigger NVMe SSD for the laptop (easy - though it was not so easy on the wallet; fortunately I had presciently managed to buy something before the AI bubble pushed prices beyond crazy), and having bought it, shuffle things around to get more space inside the VM.
To be clear, this is not an exciting story: much of this is notes for myself, so that next time I have to do this I can refer to what I did last time - or in case anyone encounters the same errors and needs the solutions.
The laptop runs Windows, but for the purposes of doing the upgrade we boot into Linux for some of the steps.
What do we need to do?
The VM's filesystem - on which we need more space - is inside an LVM volume; that's on a partition of the VM's (virtual) disk. The VM's virtual disk is a (big) file on the laptop's Windows partition, and that lives on the physical disk itself.
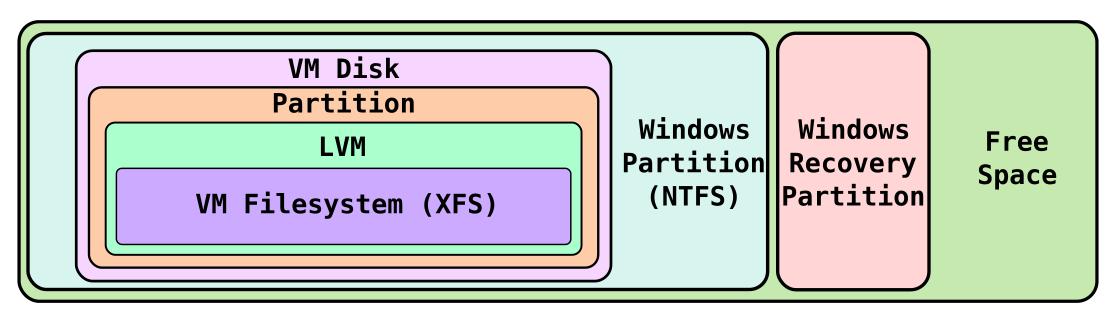
In order to expand the VM's filesystem - once we've moved everything across to the bigger disk - we need to expand each of the various layers that surround it, in turn, including shuffling around anything that gets in the way.
Copy the existing disk's contents over to the new disk
- Insert the new NVMe SSD into the laptop's spare slot (fortunately it has two slots; this makes upgrading much easier!)
- (In Linux) Use
ddto copy the raw blocks across from the old disk to the new one. - Remove the old SSD (in case I mess up the following steps)
Expand the main Windows partition
Unfortunately this can't be done straight away, because there is a Windows Recovery partition occupying the space immediately after the partition we want to enlarge. So we have to move it to the end of the drive:
- (In Windows) Use
reagentc /disableto disable the recovery partition - (In Linux) Use
fdiskto create a new partition, with the same size as the old recovery partition, at the end of the disk - (In Linux) Use
ddto copy the contents of the old recovery partition to the new one - (In Linux) Use
fdiskto change the type of the new recovery partition to "Windows Recovery", and change the old one to a "Linux" type (so that Windows can't see it) - (In Windows) Use
reagentc /enableto re-enable the recovery partition - (In Windows) Reboot with "advanced startup" to check that the recovery partition seems to work
Now that there's nothing immediately after it, expand the size of the main C: partition, and of the filesystem it contains (using the Disk Management applet in Windows - fortunately it does both these things at once, which saves a little bit of faff)
Now we at least have more space on the C: partition... so we can start expanding the size of the VM's disk.
Expand the VM's disk
I've done this frequently before, and it used to involve a bunch of fiddly CLI incantations - I mean, yes, so does the fdisk stuff above, but I've done that frequently enough that I feel I know what I'm doing; the VirtualBox commands I'm less familiar with, and hence have to look up every time. So - I was overjoyed to find that there's now a UI in VirtualBox that means you can resize a disk just by dragging a slider to the correct size, and clicking a button!
I was somewhat less overjoyed when I tried this, and got the error
Resizing to new size 53687091200 is not yet supported for medium ',,,\myvm.vdi'.
Result Code:
VBOX_E_NOT_SUPPORTED (0x80bb0009)
Result Detail:
-37 (0xffffffdb)
Component:
MediumWrap
Interface:
IMedium {7d510820-a678-4730-a862-818dcd3fbed0}
Fortunately a quick search revealed that the issue is that the disk was created at a fixed size, and (more importantly) the workaround is to copy the disk to one of a new size - which can be done in a few moments with sliders and clicks.
Of course, then, the new disk is named something like myvm_copy.vdi, and isn't being used by the VM. No problem, thought I: rename the old one to myvm_old.vdi, and rename the new enlarged one to myvm.vdi.
Unfortunately this fooled nobody: VirtualBox aborted startup of the VM, because the GUID of the disk had changed:
UUID {12345678-0123-9abc-def0-fedcba987654} of the medium 'C:...\myvm.vdi' does not match the value {11111111-2222-3333-4444-555555555555} stored in the media registry ('C:\...\VirtualBox.xml').
Result Code: E_FAIL (0x80004005)
To fix this, I had to release and remove the disks from VirtualBox's media manager ("remove" doesn't delete them - unless you ask it to - just removes them from its list), then add myvm.vdi back in again, and finally re-attach it in the VM's storage settings.
After this rigmarole, the VM once again deigned to boot - and using blockdev --getsz /dev/sda showed that the disk was indeed bigger than before.
Expand the size of the LVM partition
The VM's main filesystem is not stored directly on the VM's disk, but is instead inside an LVM volume, the physical volume for which is on a partition on the VM's disk. This means that, before we can enlarge the filesystem to take advantage of the bigger VM disk, we have to fiddle with LVM to tell it about the extra space.
Since the LVM partition is stored within a partition of the VM's disk, the first job is to enlarge that partition to fill the disk.
In the past this operation was a little scary: to change the size, you had to delete the partition, and then recreate it with the same start, but a larger size. But it turns out fdisk now has a command to resize a partition - entering e at the prompt will let you pick a partition and then give it a new size, even defaulting to "the rest of the space available". Nice! So I did that, and blockdev --getsz /dev/sda3 confirms the partition is larger.
Enlarge the LVM physical volume
This will be straightforward - or so I thought! Unfortunately a simple pvresize /dev/sda3 produces the error
  Cannot use /dev/sda3: device is not in devices file
  0 physical volume(s) resized or updated / 0 physical volume(s) not resized
That's odd, because pvs -A confirms that /dev/sda3 is known to LVM:
  PV         VG        Fmt  Attr PSize   PFree
  /dev/sda3  almalinux lvm2 a--  <19.00g    0
So what's going on? Some sources online suggest running lvmdevices --adddev <device>. Doing so produces an initially scary warning:
 WARNING: Adding device /dev/sda3 with PVID abcD0123FghI8574JkLMrepi54e2fR6V  which is already used for missing device device_id t10.ATA_VBOX_HARDDISK_VB12345678-fedcba98.
Add device with duplicate PV to devices file?
So what's going on? My best guess is that the action of copying the VirtualBox disk - which we had to do in lieu of resizing it in place - has changed the disk's unique id, so we need to convince LVM to use it. After a bit of fiddling around, using
# lvmdevices --deldev /dev/sda3
Device /dev/sda3 is used by an active LV, continue to remove? y
# lvmdevices --adddev /dev/sda3
got the job done, after which pvresize /dev/sda3 was successful.
Enlarge LVM logical volume
This was a bit fiddly, but it turns out the magic incantation is
lvresize --extents +100%FREE almalinux/root
where almalinux is the name of the volume group (from running vgs), and root is the name of the logical volume (from lvs).
Enlarge the VM's filesystem
At least this one was straightforward! The VM uses XFS for its filesystem (presumably an installation default, as I have no recollection of choosing it. All it takes is:
xfs_growfs /dev/mapper/almalinux-root
where the path comes from df -h / - which is also the command that confirms that the root filesystem now, finally, has enough space to install those gargantuan tools!
0 comments